Yeah, i was using 24AWG wire! LOL
if you are going the 8-1 route, i would suggest 26AWG or smaller.
You could always make them like a set of exhaust headers, and go 4-2-1 (4 punches into 1, 4 kicks into 1, join the punch and kick lines). There are quite a few ways to wire it up, depends on how much wire you want to use and how you want to route it in the case.
i got a question / seeking a recommendation. i kno some of you guys are dremelling out the microswitches for the headers some are installing onto the arcs…and i am looking to buy a dremel / rotary tool. what are you guys using? and around what rpms with what bit lol? im currently doing some searching for a decent all around dremel / rotary tool, but there are countless options, bits, variable speeds, ect. ideally i would like one that cut plastic, pcbs and metal, so i dont have to buy a separate use one in the future. if you gentlemen share what you are using or can make some recommendations so i can make a better informed decision that would be great. i have the pic saved that teeth posted in the arcs thread with the cutting guidelines for microswitches, so i think im good at least in that aspect.
I found a decent looking kit, if guys could chime in and let me kno: Amazon.com: Kawasaki 840589 190-Piece Rotary Tool and Accessory Kit: Home Improvement
teeth thanx for the tip about video game nyc, finally went and got my buttons today, cheapest around @ $3.75 each, no shipping but 8% sales tax lol, came to about $65 total for 16 buttons so not too bad. but that place took me forever to find, mainly b/c i couldnt find where the hell E 6th street was at that shit didnt start until 5-6 blocks off of broadway, and i was freezing my ass off lol. very nice lil boutique tho, all of classic console collectable and other stuff for sale, I basically wanted everything in that lil back room lol. When you went did they have any custom sticks on sale? i saw they have one or two dual modded SEs and a bunch of hori imports. Their site says they do repairs but dont do console modding and not to even think about asking about it, but when i was there two people walked and started having a full blown console modding discussion on that they do in store lol. Overall a great spot im def going again now that i kno exactly where its at, too many sleeper deals on those shelves. Thanx! 
Truth be told, you don’t even need a dremel. You could get the job done with a hand file and some elbow grease (which is what I did on a few once the battery died in my dremel the first go round!). That said, for the purposes of this mod, just about anything tn the dremel lineup will work. I’ve got a cordless lithium version I’ve had for a while and recommend. I bought a corded 200 series this summer (had to cut off some rusted bolts on my car and the li po dremel wasn’t charged up in time).
hey Shin
I have a few dremmels, but for modelling and taking care of plastics i use a Dremmel MiniMite 4.5volt wireless. it’s good for what you need it to do, just don’t try to chomp too much off at once, go thin.
as per VGNYC, yeah, they are off 3rd Ave on south side of East 6th. Super helpfull and such.
^^^^ nice! hey teeth ive been working on sort of a side project, stick related but in a different kind of way. at the same time its a lil gift/tribute to you and sparky jr. nothing terribly exciting but, i have a feeling a you may really like it. it should be ready in a day or two, ill send you the info via email soon
you have my interest peeked! looking forward to it!
on a side note. i was out with @purplearms last friday and was mentioning my duo-core spraky jr LOL, i put stacking headers on it.
the first one was for the typical RGB LED mod and the second is purely there as a cheatstick / move interpreter. I ended up doing this to an old ChImp i had.
sort of meaning you wrote a firmware that works on a sparky that you can program moves/combos too? sort of like a shield for sparky? i remember you mentioning the cheatstick before, but no info… at least i can imagine 
yep, it’s pretty much like a shield.
i only use the button input lines and the button output lines are replaced with the four directionals of the joystick. from there i essentially leave it in a digitalRead state until some ‘key chain’ combination is executed. then the pins switch back to digitalWrite for the duration.
the command output chain is all about delays, and pulling the proper lines LOW.
one of the many ‘undocumented features’ of the Sparky Jr is that you can repurpose it for anything you want. i know one of the digital artists was intending to use piezo discs as inputs through the RGB pin header. and the 2 rows of 8 where to be used as outputs. 8 for tones and 8 for lights… …go figure.
Are these the new version?
the ones back in stock are the restock of the Sparky Jr
The PWM won’t be here until new year
hey everyone I just want to share part of my side project and its sparky related so check it out:
http://farm6.static.flickr.com/5126/5279025477_d71787415c.jpg
(click for the full set).
basically these are my artistic renditions of 32teeth’s kick-ass Sparky Jr board. for those of you who have one already, you kno they are beastly. if you are on the fence about getting one, just get it you wont regret it lol. and you have excellect tech support to boot.
these are awesome! can’t wait to see what else you come up with.
oh, an BTW

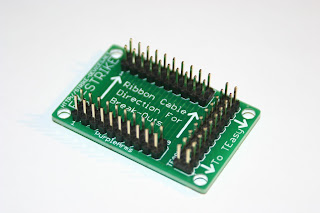
this is kinda what the DuoCore Sparky Jr looks like (well, Sparky + Cheat Stick)
for those who are looking to get one, we have them back in stock http://sparky.32teeth.org
Sparky Jr + PWM + 20 (2x10) Connector Sneak Peak
Oh, you know, after some requests.
[LIST]
[]Moved a few pins around
[]Introduced RGB to the PWM pins (this means lots more color options, like 16 million more)
[]Introducing the 20 (2x10) pin connector… …oh you know, cus we all like ribbon cables!!!
[]New connection point for VCC & GND, for those who don’t want to double stack the FTDI and Power chain
[/LIST]
http://sparky.32teeth.org/001.png
http://sparky.32teeth.org/002.png
http://sparky.32teeth.org/002.png
http://sparky.32teeth.org/004.png
http://sparky.32teeth.org/005.png
http://sparky.32teeth.org/006.png
oh, and for those who want to play around with the SCH or BRD files, they are publicly available in the SVN!
Looking good! Should interface nicely with EX strike  heheheh
hint taken! this will be fun, since its just a revision of the board and most of the stuff already in my layout…this also gives me a reason to model some dual stacked right angle headers, maybe some shrounds too…thanx for the stock stuffer! between this and the shield, im good for the holidays…now only if those calipers would get here, the siemi buttons and the jlf are not going to be fun since there no good detailed drawings of them available that i know of. but if i can pull it off and some people verify the measurements, then they can be made available for everyone
and i figured out what the solder pads and shit were coming up black in a lot of the renders…and its because its reflecting of black ceiling and walls, since i had only modeled a wooden surface and put a light above it. future renderings are going to be looking much better, at least i hope. more of those soon!
there is a tutorial on Make (Make: Online : Eagle3D + POV-Ray = circuit board preview) on some hack using POV Ray and Eagle files to create renders. never gave it a go. might be worth a look though.
erm, more silks added. top and bottom now
thanx for the link, saved it til i have some time to read up on it is that the intended color scheme? black/goldish?