Shoot me an email. I have LEDs to go with the boards White, Red, Blue, Green, Orange, Yellow and UV. I also have some boards ready to go for 6 button layouts.
What exactly does UV look like?
Sorry to bump this up, but there a good way to mount the LED’s in snapins? Or better yet, can they be put in there in the first place? I somehow managed to get a set of PS-14-'K’s in all clear, and wanted to switch em with sanwa switches, yet also do the LED mod.
I used snap-ins for my HRAP2 mod. Just pop off the top plunger, then have the legs stick out from the sides with the tabs that snap onto the control panel
This is exactly what I did. Make sure to designate one side for the ground and make that consistent throughout the LEDs because it’s muy dificil to tell once they’re in.
please dont let this thread dissapear…
it should be added to the essentials thread imo…
For those wanting to do this project on newer consoles with +5V (PS3, XBox360), you can simplify the schematic and remove the batteries.

HTH
Just a small update for people who want to use a battery pack. I’m still using my very first set of batteries, so you won’t be changing them out that often =P
ok i have no electronics stores (besides radio shack which doesn’t carry shit) within 100mi of me and cannot find the hex inverters online. anyone have a link to a good electronics supplier?
digikey.com
mouser.com
newark.com
jameco.com
Digikey is where I get most of my stuff, but there’s a $5 surcharge if your total isn’t over $25, so browse around and expect to blow $33 or so after shipping. Good side is that their selection is just amazing. Spend some time learning how to use their menus and catalogs to find stuff, and always check the ‘in stock’ box when searching. After you know exactly what size/wattage/color/shape/flavor of something you want, expect to go through 3+ pages of results looking for the cheapest. Lots of items have pictures and almost all have datasheets.
Just wanted to say a big thank you to everyone involved in this thread. Its a great mod and you all hashing it out made it more or less pretty simple for me to apply.
I put it together this weekend to finish off my Texas Fight stick - [media=youtube]bmmVGHlsGo8[/media]
Thanks again everyone for your contribution to my project!
(also this thread deserves a bump!)
Gj i used this tutorial for mine too i posted a vid response for it
Great info in this thread, but I’m still not clear on the use of batteries. If I want only 1 led on 1 button (for lag testing), and I don’t care how dim it is as long as I can just see it, then could/should this be done w/o batteries? Since I have one of Toodles’ upcbs, I’m going to be using it on various consoles (all under 5v?).
If I don’t need batteries, then what type of led and resistor should I get to prevent an unsafe draw from the consoles?
I just ordered two 6 button flash boards from Kaytrim and two Cthulhu PS3 boards from Lizardlick. My problem is that I’ve never done a light-up mod before. Could someone
be so kind as to draw up a simple diagram of how those components would hook up
together in a stick. :wonder:
btw: thanks to Toodles and KaytrimKustoms for the parts. You guys make it easy for
entry-level stickbuilders.
-jayducky
I think either way is fine. Batteries just make sure that the LEDs won’t cause any lag, but then again, I haven’t heard of any problems with the 5v from controllers.
As for the items, just stick to the stuff listed in the first post. The battery setup supplies almost as much voltage as pads do (they’re .5v off), so as long as you don’t stray too far from the ratings I listed, you’ll be fine.
Diagrams are on the first page. Kaytrim’s board makes things easier by having the resistors and the hex inverter wired up. You’ll understand everything once you have it next to the diagram =)
I am adding this information to Numski’s Wiki site.
http://padhacking.numbski.com/index.php/Main_Page
Kaytrim
Awesome. Thanks for that =)
I’m about to start this mod for a cabinet panel, but i wondered:
How would I go about switching off the light-up part on the panel ? (making the pcb act as normal but without leds)
If I connect the switch between +5V and +Vcc of the inverter chip, when this switch is off, the inverter will suck power from the PCB and this will activate all 6 buttons (not leds).
If I connect all the negatives LED terminals to one leg of the switch and the other leg to the ground, the leds won’t light-up anymore but the inverter will be continuously fed.
I can see no other (simple) possibility for making this option work.
This question is pretty much academic from a panel point of view (plenty of power there) but seems relevant in a custom stick situation. What you guys think ?
Hi,
I’ve made a light up on press button mod on my arcade stick, too. Here are my experiences and some pics:
I’ve built-in a SMD 0605 RGB led in the button. 5mm RGB leds doesn’t make a good job at mixing up colors.
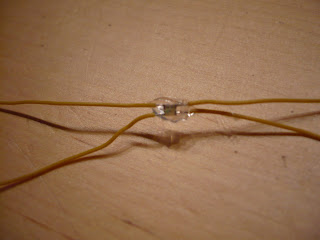
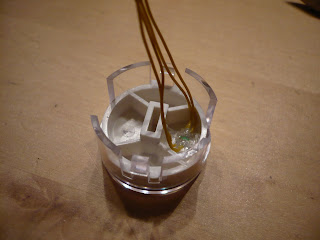
Button used is Seimitsu PS-14-GN-CP.
With the RGB Leds I had all options realize color schemes. I’ve based my button led colors on the xbox360 one (when not presses of course). When pressed they light up in red.
Here is the result:
[media=youtube]fTEDRflHAZQ"[/media]
Now the realization. The leds are all common anode. This means they on connection to VSS. Per led are three connections for ground. I’ve put the led resistor to the anode. Here is space for enhancement. When you put specific resistors to three cathodes you can mix up different colors. I’ve used this only for the yellow led in my mod. I didn’t apply any inverters, because I soldiered the cathode to button pin. Here’s the schematic

If you want a idle mode color (button is not pressed) wire the needed color (cathode) directly to ground.

ToDo is light up stick on movement. So far I realized only color change when pressing in one direction. Problem is to control one led color with four switched at the same time. Has anybody ideas without using microcontrollers?
What is the advantage of using inverters compared to my approach?
Please put these on the wiki.  Please? On the Main_Page there’s instructions on how to add pictures.